I Tip Hair Extensions Care and Maintenance | Micro Links for African American 101

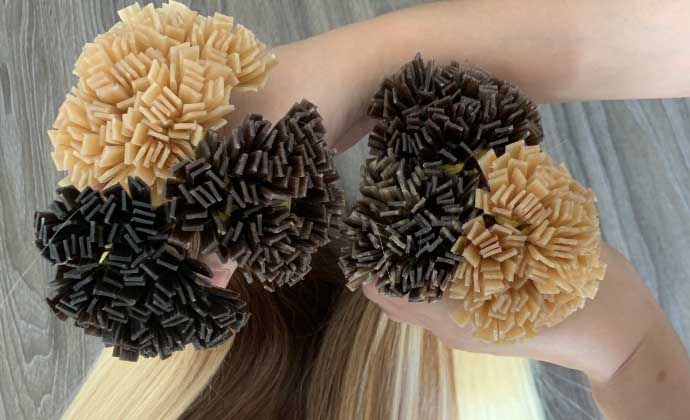
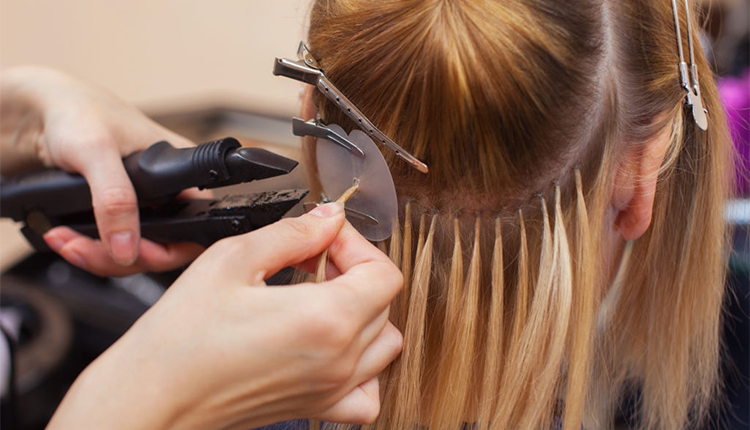
What are I-Tip Hair Extensions? Are I Tips healthy for your hair? How long does I-tip extensions last?  What are the I Tip Hair Extensions for Black Hair Pros and Cons? What are the I Tip Hair Extensions Care and Maintenance routine? What are the Best Micro Links on African American Hair type? If you have any of these questions, please read on as we break down everything you need to know about I Tip or Microlinks! You will discover the answers to the questions in this article. I Tip hair extensions are not as popular as other hair extensions. However, they have a lot to offer. This article will serve as a guide to hair extension experts and beginners.

What are I-Tip Hair Extensions? | What is Micro Link Extensions?

I Tip hair extensions are very different from other hair extensions, considering the installation and other factors. I Tips are commonly called stick tips or micro ring hair extensions. They are permanent extensions making them suitable for hair types and people with an active lifestyle. I-tip hair extensions are hair strands with keratin tips attached to the natural hair by microbeads, rings, or shrink tubes. The clamping of the micro rings secures the extensions on your natural hair. The micro rings can be silicon, metal rings, or copper tubes. However, the most durable is the silicone microbeads which are less prone to damage by external factors. Unlike U-tip hair extensions, I Tips uses the cold fusion method. This installation process makes use of no heat or glues of the sort. Without bonds or heat application, I-tip extensions are less damaging to the natural hair and easy on the scalp. This is why micro links for natural hair are quite popular these days!

What is the Difference Between I-Tip and Micro Links?

I-tip Hair Extensions vs Microlink: Both terms can be confusing to beginners and even hair extension experts. Interchanging the words is not terrible, but it is best to know the difference if you wish to understand I-tip extensions better. I-Tip refers to strands of hair with keratin tips. These are the main parts of the micro link installation. When thinking of I-tips, consider the end of shoelace straps but with strands of hair instead. Micro links are the installation method or process that includes using microbeads or rings to attach I-tip extensions to the natural hair. The final step to ensure the security of the hair extensions is clamping the microbeads or rings with a plier. In summary, while one term is the product- I tip hair extensions, the other is the installation process.

How to Install I-Tip Hair Extensions | Micro Link Hair Extensions Installation

Many may prefer paying a visit to the salon for Micro Link Hair Extensions Installation. However, with proper guidance, installing I Tips can occur in the comfort of your home. The installation of I tips is a strand-by-strand technique that involves using a hair extension plier tool.

Here are a few easy steps to installing I-Tip hair extensions yourself;

Step 1:

Wash, condition then properly dry your natural hair. Some experts may advise the use of hair products. However, it is best to use fewer products to avoid slippage. Tip: Slippage is the falling out of I-tip extensions from the head. It is not unusual and occurs when the microbeads attaching to the natural hair become loose.

Step 2:

Section your hair horizontally using a pintail comb, starting at the point above your ears. Take a portion of your natural hair about 1cm wide. Tip: Clean sectioning prevents the matting of hair and eases pressure on the scalp.

Step 3:

Use your threader tool to pull the piece of hair through the loop. Push the top ring up onto the hair. When the microring is on the hair, hold it in place at the root with your finger.

Step 4:

After the first three steps, add the tip of the I-Tip hair extensions into the ring and clamp shut with the hair plier or clamp tool. Tip: Place the micro rings at least half an inch from the scalp to prevent discomfort. You can unclamp and reposition if the extension is too close to the scalp.

Step 5:

Repeat the process in step 5 in the areas you select. Check for knots to avoid discomfort during and after an application process.

How to Remove I-Tip Hair Extensions.?

The process of removing I-tip hair extensions is easy than its installation. Removal of I-tips is a straightforward method. To remove I-tips, simply;
  1. Divide your sections and work across your head, from your hairline to your nape.
  2. While using minimal pressure, clamp the opposite edges of the microbeads, rings, or shrink tubes.
  3. The micro rings will open up slightly. Gently slide the I-tip extensions down your hair. Do not pull or tug on the hair extensions. They will come off.

I Tip Hair Extensions Maintenance | I Tip Hair Extensions Care

While I-tips may be one of the most durable extensions in the market, the life span of this product depends on care and maintenance procedures. Without proper care, the best human hair extensions can become useless.

Here are a few tips on how to care for your I-tip hair extensions:

• Washing regularly can be beneficial. However, wash I-tips at least once in three weeks to avoid wearing out the micro rings. • When washing, I tip hair extensions and use sulfate-free and paraben-free shampoo products. • Apply conditioner on the ends of your extensions. Do not use conditioner on the microbeads of your I-tips. • Dry your I-tip hair extensions properly with a towel. You can also air dry. Do not style your I-tips when wet. • Brush once or twice a day with a natural bristle brush. • Minimize the number of products you use on your extensions. • Use moisturizing products only. To maintain the shine and luster of your I-tips. • Reinstall your I-tips every six weeks. Due to hair growth, pay a visit to the saloon. A professional will help push up the micro rings of your extension and ensure the strands are secure. • Protect your extension from intense sun, sea, and chlorine. Before swimming, wet your hair with fresh tap water and apply a small amount of leave-in conditioner. Tie in a braid or loose ponytail. After swimming, rinse immediately and wash as soon as possible. • Secure your I-tip hair extensions in a loose ponytail. Use a silk scrunchie when you go to sleep.

I Tip Hair Extensions for Black Hair Pros and Cons

I tip hair extensions are always on the list for enthusiasts and beauticians. There was a time when people thought black hair was unsuitable for I-tips. However, this statement is untrue because I-tip extensions are perfect for all hair textures. Especially black hair, due to its coarse nature and firm grip on the microbeads. Though not common like U-tips, I-tips have a lot to offer, making them move up the rank in the market. Before purchasing I-tip extensions or booking your next appointment at the saloon, there are a few things you should know about I-tips;

Pros of I-tips- Benefits of using I-tip hair extensions:

1. Versatile: I tips are very versatile due to their installation method. The strand-by-strand technique ensures a natural look. The strands of I-tips enclosing natural hair make the extensions easy to style. 2. Reusable: I-tip hair extensions can last up to a year. Also, installation can last up to six months. Proper care can make your I-tips reusable after removal. Tip: Hair extensions vary by material and texture. It is best to go for Remy or Pure cuticle virgin hair extensions. They are tangle-free, silky, and smooth to the touch, making them durable. 3.  Zero damage: One of the greatest fears of hair lovers is the amount of damage extensions can cause. I-tips act as a protective style. Also, due to easy access to the scalp, they are less prone to cause damage. I-tips are lightweight. This feature makes them preferable for thin hair. The silicone microbeads are safe for natural hair strands. Installing I-tips requires no heat or glue, making them a great alternative to hot fusion.  4. Low maintenance: I tip hair extensions are very durable. They are semi-permanent extensions, making them the perfect option for an active lifestyle. I-tip extensions retain their shine and luster for a very long time. I-tips are water and oil resistant. 5. Quick and easy removal: Removing I-tips is not time-consuming. It simply requires the right tools – an extension plier and your hands.

Cons of I-tips- Problems of using I-tips:

While I-tips are perfect for your natural hair in more ways than one, there are some cons to using these extensions. They are; 1. Reinstallation: I-tip extensions require reinstallation and reapplication once in four weeks. Slippage occurs over time due to washing and product use. Clamping the microbeads after they are loose is necessary. However, it can be a bother. 2. Pricey: I tip hair extensions can cost a lot due to the installation labor. The prices of I-tips also depend on raw materials. Remy and Virgin, I-tips are more costly in the market. Due to their high prices, customers consider I-tips a long-term investment.

Đánh giá

0 0 votes
Đánh giá bài viết
Subscribe
Notify of
guest
0 Góp ý
Inline Feedbacks
View all comments

Cart

Products currently in the cart now


0
Would love your thoughts, please comment.x
()
x